
So, you’re here to unleash the wild side of Tumblr and enable sensitive content? You clever cat! Let’s break it down so you can dive into the depths of creativity without any pesky barriers. Hold onto your digital seats; here we go!
First, let’s tackle it from your computer because, you know, sometimes a full-sized keyboard feels a lot more empowering than your phone. On the Web: simply saunter over to the left-hand corner of your screen and click on Settings. The world of Tumblr customization awaits! Don’t rush, savor this moment. You’re about to become the content wizard of your own blog.
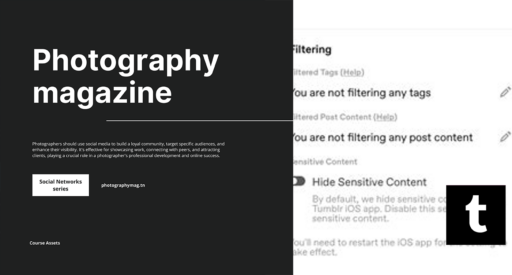
- Once in Settings, scroll down until you spot the “Content you see” section. It’s a bit like a magical doorway to realms of user-generated chaos.
- Right next to “Filtered Tags”, you’ll see a friendly little pencil icon just waiting for you to click it. Give it a little love tap.
- Now, here comes the fun part! Type in the tags you want to filter. You can filter out *all* the mundane nonsense, allowing sensitive and edgy content to flood in like a scene out of a movie where the protagonist embraces their true self.
- Want to remove a filter? No worries! Just click the Remove button next to the tag you highlighted (like a shy student on the first day of school, who realizes they actually love all the subjects). Voila, it’s gone!
And there you have it! With these simple steps, you’ve transformed your Tumblr experience into a treasure trove of sensitive content. Remember, with great power comes great responsibility. Choose your content wisely and prepare for some eye-opening adventures! Happy blogging!