Are you tired of your Tumblr posts looking as colorful as a unicorn threw up on them? Do you want to achieve a cool, sleek aesthetic? Well, you’re in luck, my friend! With just a sprinkle of HTML magic, you can make that post background as transparent as a ghost at a Halloween party. Ready to dive into the wonderfully wacky world of Tumblr customization? Let’s get started!
Why Make Your Background Transparent?
First, let’s talk about the why. Who wouldn’t want their posts popping against a stunning background? Making your Tumblr post background transparent can elevate your blog’s aesthetic—perfect for showcasing images, quotes, or even those artsy doodles you insist on calling “content.” Plus, a transparent background is a great way to let the magic of your blog’s overall theme shine through. So let’s learn how to work that CSS and make your posts as cool as a polar bear in sunglasses.
Step-by-Step Guide to Make Your Tumblr Post Background Transparent
Ready for some action? Follow these steps and unlock the secret arts of transparency:
- Log In to Your Dashboard: Well, duh! You need to log in to where the magic happens. Navigate to your Tumblr dashboard like the boss you are. 🎉
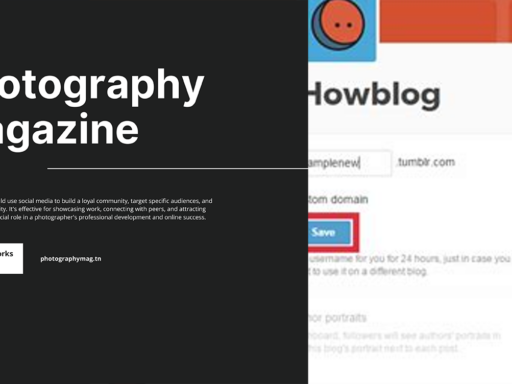
- Click the “Edit HTML” Button: Once you’re staring down your blog, scout out the “Edit HTML” button. It’s typically hiding under the “Theme” section. Click on it like you’re slapping an annoying kitten off the counter. 🐱
- Finding Your Post Background Styles: Now comes the tricky part. You need to locate the CSS styling for your posts. Look for {} brackets. It’s like finding a needle in a haystack, but you’ll get there with patience (or wine). 💡
- Insert Opacity: This is where the real fun begins! Between the braces, insert opacity: [#];. Here’s the deal: the value for [#] can be from 0 (completely transparent) to 1 (fully opaque). For example, if you want your posts to look like they’re on a mild transparency diet, you might go for 0.6. It’s like dressing your post in a stylish light haze instead of a heavy coat!
- Preview Your Changes: Don’t just jump in without looking! Hit up that preview button like it’s a movie trailer—check how your post looks. Adjust the opacity value if it needs more sass or less (like your last Tinder date). 🍷
- Click “Save”: Once you’re thrilled with your artsy design, smash that “Save” button! You’re done! Your posts are now stunningly transparent. You’ve created a new masterpiece, and let’s hope your followers enjoy your sleek new look. 🍾🎨
Playing with Opacity Values
Let’s dive deeper into opacity values because why not? Just like in the kitchen, a little too much salt can ruin the dish. The same applies here, folks! Here’s a breakdown:
| Opacity Value | Description |
|---|---|
| 0.0 | Completely Transparent – Your post vanishes! Like that last piece of pizza at a party. |
| 0.1 | Very faint – More of a memory than a post. |
| 0.5 | Halfway Visible – Your post is standing at the door, contemplating whether to come in or not. Awkward times! |
| 0.7 | Almost opaque – Your post is starting to come around but is still pondering its choices. |
| 1.0 | Fully Opaque – The pole position of visibility! Your post is here to stay, bold and proud. |
Additional Customizations
Want to take your magic one step further? You betcha! You can play around with other CSS properties to give those transparent backgrounds a run for their money. The possibilities range wider than your aunt’s holiday fruitcake recipe.
- Background Color: You can change the background color to something funky while still maintaining transparency. For example:
background-color: rgba(255, 0, 0, 0.5);
border: 2px solid #ffffff;
Troubleshooting Common Issues
Sometimes, the universe conspires against you, and your creative masterpiece doesn’t come out as planned. Here are some common problems and their solutions:
Post Still Looks Opaque: Double-check that you’ve correctly inserted the opacity property into the right CSS section. If it still isn’t transparent, make sure that there’s no contradictory CSS hiding elsewhere.
Text Not Readable: If transparency has turned your text into a ghost story, consider adjusting the text color for better visibility. You don’t want your readers squinting like they’re trying to solve a riddle, do you?
Alternatives to Adjusting Transparency
If you’re feeling overwhelmed with CSS coding, not to worry—Tumblr has convenient settings under customization that allow you to toggle some background features. Just remember, while this option exists, the full power lies with your inner coder!
Time to Show Off Your Work!
Once you’ve polished your background to a transparent shine, it’s time for some social media bragging rights! Share your fantastic new look with your friends, followers, and anyone who will listen (even the random bystanders on the street). Post a screenshot, and revel in the glory of your well-deserved compliments. 📱👏
Wrap It Up With Style
And there you have it, folks! You’ve just leaped from a plain-Jane background to a work of art with the sweet magic of transparency. Whether you’re going for mysterious vibes or just looking to showcase your content, now you have the tools to make your Tumblr posts reflect your unique personality. Now go on, my digital Picasso, and make your blog the most stunning thing on the internet. Just don’t forget to give credit to the genius behind the curtain—you!
So next time someone asks, “How do I make my post background transparent on Tumblr?” you can beam with pride and say, “Let me show you the ropes!” Until then, keep those posts transparent and fabulous! 🌈✨