Can You Have a Custom Domain on Tumblr? Absolutely! Let’s Dive Into It!
Tumblr is often seen as the quirky cousin in the social media family. If you ever find yourself swiping through beautifully crafted blogs and wish you could slap a custom badge that screams, “Hey! This is uniquely me!” — rest assured, you absolutely can! Having a custom domain on Tumblr not only adds a sprinkle of professionalism but also gives your blog a sense of individuality. So, let’s kick things off so you can show off your personalized slice of the Internet!
Set the Stage: What is a Custom Domain?
Before we jump into the nitty-gritty of making that custom domain sparkle, let’s clarify what it is. A custom domain is like the ultra-cool address of your blog. Instead of using the default URL format, such as yourblog.tumblr.com, you can strut around with something more chic and DIY, like yourfantasticblog.com. Talk about turning heads! It’s akin to trading your trusty bicycle for a shiny new sports car. Trust me, you’ll want to be in the driver’s seat of this sleek domain!
Why Go for a Custom Domain? Here’s What You’re Missing Out On!
- Branding Brilliance: A custom domain strengthens your brand identity. It’s your blog—give it the domain it deserves!
- Trust and Credibility: Custom domains can help create trust with your audience. Think of it as a badge of honor— your blog means business!
- SEO Advantages: Search engines adore custom domains. Who doesn’t love a little SEO advantage to boost your visibility?
- Professional Appearance: Stand out from the crowd, and look like you put some serious effort into your blog!
Let’s Get Down to Business: Setting Up Your Custom Domain
Ready to make your mark? Here’s a step-by-step guide to activating your custom domain on Tumblr that even your grandma would find easy (no offense to grandmas out there!).
- Login to Your Tumblr Account: After all, we can’t get anything done unless you are logged in. It’s the golden rule of the Internet!
- Click the Account Icon: Look to the top right corner — that’s where the magic happens. Click on the account icon and get ready to unleash some customization!
- Access Settings: From there, select Settings. You know you’re on the right path when you see the settings page pop up like a well-dressed genie.
- Select Your Tumblr Blog: Look for the sidebar on the right. This is where you’ll identify your blog faster than you can say “custom domain!”
- Edit Settings: Next to your username, you’ll see a pencil icon. Click on it to make magic happen.
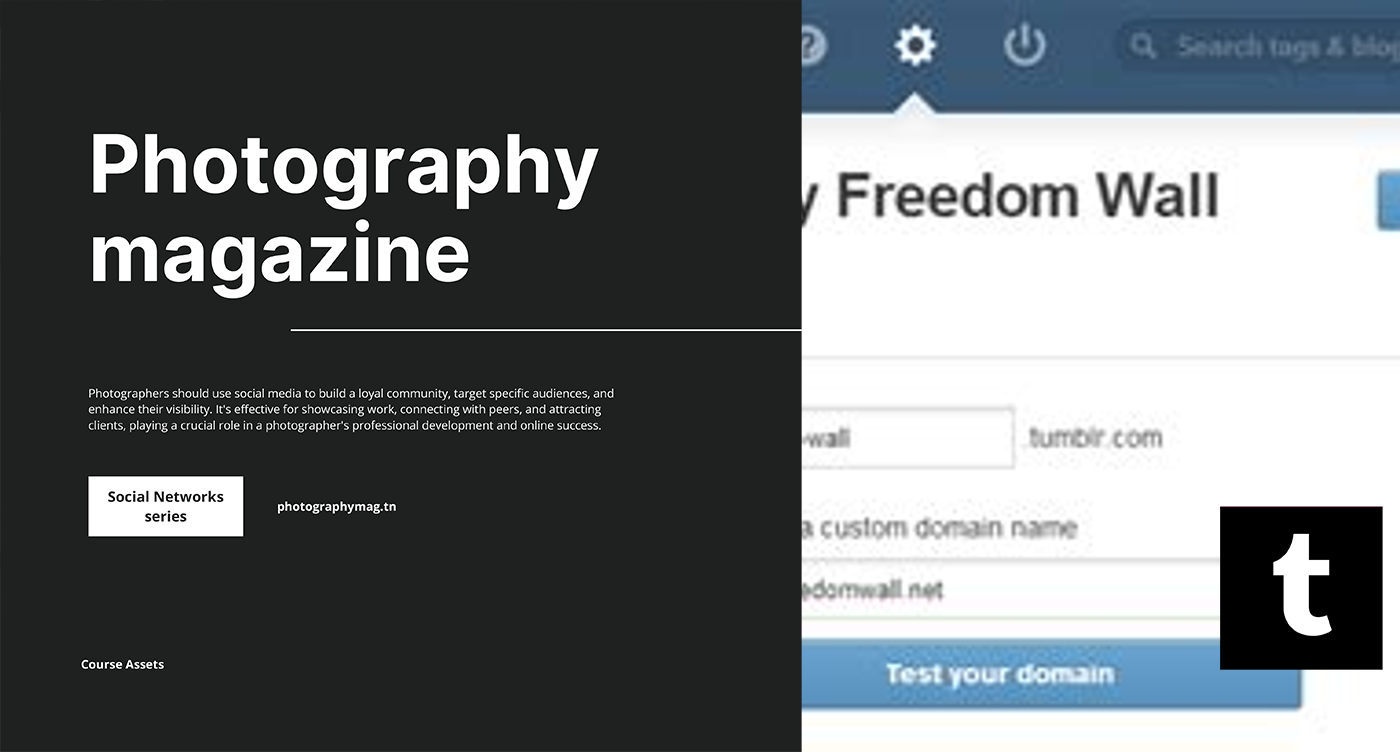
- Activate Custom Domain: Now, this is the big moment! Activate the slider next to Use a custom domain to tell Tumblr that you mean business. Don’t panic if it’s a bit touchy—just keep your focus!
- Enter Your Domain or Subdomain: It’s time to enter that shiny new domain name you set up prior to this momentous occasion. Make sure it’s the one you configured. Double-check, because mistakes can be louder than the last time you attempted karaoke!
Once you click Save, get ready to see your blog metamorphose into its ultimate form — a magazine-worthy masterpiece!
Wait, Is That It? Almost…
Now, hold your horses! Just because you’ve set things up doesn’t mean the work is done. You need to tackle a few behind-the-scenes details before everything is smooth sailing.
Don’t Forget DNS Settings!
Your custom domain isn’t just going to magically work. You’ll need to configure DNS settings through your domain provider. Did I hear someone say “complex”? Fear not!
- Access Your Domain Provider: Log into your domain registrar’s site, and locate the DNS settings. Don’t worry; the settings interface is usually more user-friendly than trying to assemble IKEA furniture without instructions!
- Set Up CNAME Records: To make Tumblrs’ servers point to your custom domain, set a CNAME record that directs to domains.tumblr.com.
- Add an A Record: You also want to ensure that your domain (without the ‘www’) points to Tumblr by setting an A record to its IP address. (You can find this in Tumblr’s support resources; it’s not dark magic, I promise.)
Once all that is set and your patience is rewarded with a little waiting, your domain will be ready to roll!
Final Touches: Your Blog Awaits!
Congrats! You’re now the proud owner of a fabulous Tumblr blog with a custom domain. With great power comes great responsibility — keep your blog updated and engaging because remember: your audience is a quirky mix of perfectionistic kittens looking for the next big thing!
Keep It Fresh and Fun!
The best part of having a custom domain is never feeling constricted by defaults. With your blog set up, explore anything your heart desires! Write like nobody is reading, share memes, dive into debates about pineapple on pizza— you do you! Customize your theme, add killer content, and watch your blog spark joy, laughter, and maybe even a few deep thoughts along the way.
While you’ve conquered this step, don’t forget that building an audience is an ongoing journey. Keep promoting your new domain, reminding friends to check out your haven on the web. Share it on social media—you know, your corner of the Internet deserves to shine like the sun on a summer’s day.
In Closing
A custom domain on Tumblr is not just a fancy add-on; it’s your very own digital storefront! So if you’ve been sitting on the fence, waiting and doubting, let this be your wake-up call. Get out there and make your mark! Trust me, with a little flair and a domain named just for you, your blog can become a captivating spectacle. A little fortune cookie wisdom: Life is too short to have a generic Tumblr URL!
So what are you waiting for? Let’s get that custom domain shining like a diamond! And remember, if the road gets bumpy, just think of it as a skateboard— sometimes you wipe out, but you get back up and ride harder. Happy blogging!